Monday, March 28, 2011
Tuesday, March 22, 2011
Progress Report #6

Chinork is coming along. main hull and inside are together. Have been working slowly on the transmission towers and the out-riggers.


I consider the Huey to be a complete project. Just needs paint. Yay! one done.


Saturday, March 19, 2011
Battle Report: Astro 2011 Playtest AKA battle of the Prototype List
Unlike previous years I decided that I would actually try to playtest my army at least more than once before a major tournament! So with that in mind Dave and I got together to try out our tournament armies. Dave was playing his 'no forgeworld' Vegas GT list and I would be playing my the prototype for my 2011 Astro list.
So lets go through the pre-game run down.
My Army:
My armylist starts with 5 scoring units in trukks, 3 boyz squads, one of grotz and one meganobz squad.
I have two characters, the Warboss of course and a Big Mek with a KFF which I find incredibly useful.
2 squadrons of Wartrakks, a squadron of Zzap gun wartrukks (Imperial Armor 11), The Huey is running as a Mek Junka (IA 11) and the Chinork is running as a Big Trakk (IA 11) and a small squad of tank bustas.
I have a fair bit of forgeworld vehicles in my army which I like because they give me a great deal of flexibility.
Lots of scoring units and men on the ground and all following my usual preference of target overlord. Essentially having more units on the board than my opponent can shoot at in a turn.
I'm running almost no dedicated specialist units this time around but I'm hoping the sheer number of targets will be able to give Dave a run for his money.
Dave's Army:
Dave arrived with a classic Dave list. Lots of Falcon hulls (4 Wave Serpents and a Night Spinner) supported by three vypers and a squadron of 5 warp spiders.
Dave is playing a larger squad of Fire Dragons in one boat and 3x 5 man squads of Dire Avengers. As he put it DAVU (Dire Avengers as a Vehicle Upgrade) essential making the wave serpent scoring.
He finished it up with his Autarch and a Farseer.
Dave has alot of armored hulls, that will be tough for me to crack. His preference lately is run scatter laser and shuriken cannons on everything. The lack of high strength guns may seem a disadvantage but I know better. He can put alot of Str 6 shots down field and cut my trukks and boyz to pieces so I will have to be careful.
No matter what I'm expecting to have to run at a wall of 12 armor with tons of shots coming down wind at me.
Scenario: Headhunt
I went digging through my scenario book and ended up pulling out a gem from a Warcon from 6 years ago. We adapted it to 5th ed on the fly. I rather like random scenarios since it helps you get a better feel for your army and at Astro there is a different scenario on every table, so flexibility is key.
The scenario is a modified victory points mission, with your general (highest point character) being worth and extra 250 VP but while he is alive all of your models get +1 ld, but when he dies all your models get -1 ld.
I also pulled out some of my con terrain from the garage, I've had this volcano table for months but I had yet to play on it!
Deployment

I managed to get the option to go first or second. I usually prefer to go second (to get the last turn) but I opted to go first to put myself in a harder position being that it’s a playtest game.
The table was fairly even, with a large LOS blocking volcano in the center.

I got to deploy first and deployed in a 'turtle formation' blocking LOS to my more valuable trukks and keeping everything under the watchful cover of my force field. I decided against reserves in the game because I knew I would have to aggressively move towards Dave.
In retrospect I made the turtle formation out of habit when I probably would have been better off deploying as close to Dave as possible since I got the first turn anyway (assuming he didn't steal the initiative)

Dave Chose to deploy everything as well. I was actually expecting him to deploy in reserve but like me he decided to have that extra couple of turns on the table to shoot at me.
I had deployed my force in the center of the table to hopefully force him in a corner (to be as far away from me as possible) but avoiding having our armies in opposite corners. Since of course its to my advantage to be as close as possible to start with.
I don't know why this pictures in sideways, don't ask its just too late at night.
Turn 1 - Alex

I started by making a B-line for the Volcano. That would get me closer to Dave while staying behind cover.
I fired of a Grot bomb and my Zzap guns to try to disable a wave serpent and a torrent of fire against the vypers but no joy. Then I hunkered in for the oncoming storm.
Turn 1 - Dave

Dave shimmied up the Vypers and the serpents and unloaded a great deal of scatter laser fire taking out my Gun Trukks, damaging a warbuggy and destroying a boat carrying my Meganobz.
He dropped a Night Spinner template in the middle of my trukks immobilizing my Huey and giving everyone markers that force difficult terrain checks to hopefully disable more of my trukks. (luckily I have rerolls on everything ;) ) You can see the ! markers in the previous picture.
It was a bit of damage but nothing I consider even close to crippling. This would just slow me down slightly.
Turn 2 - Alex

At this point my plan began to spring into action. With Dave in the corner I decided to swing my forces in two directions around the volcano. With my force driving towards Dave he would have 3 choices. Move towards my main force and all my guns exposing his flank to my tank hunters. Or move towards the tank hunters head on and expose his flank to my main force. Or move into the corner and fight my entire army head on.
My hope was to crack some of his boats. At that point if he tried to make a break for it I could decide to give chase or abandon and clean up the Eldar left on the ground for the victory points.
I moved my boyz into position and fired! And once again couldn't kill anything. Hopefully my boyz will dig out the live ammo next turn.

Turn 2 - Dave
Dave started the turn by rolling for reserves with the Autarch +1 and got his Warp Spiders in. They jumped in behind my lines, but deviated 11 inches. Still in a great position to damage my tanks from the rear and he managed to immobilize one of my trukks.
Dave then moved up his Vypers to attack and hopefully screen his wave serpents and moved the serpents to unload into my tank hunting wartrakk squad.
He does modest damage to some more trukks and continues raining down Webs from the night spinner.
Turn 3 - Alex

I start my turn with a series of repair rolls from my grot riggers and my big mek to fix my trukks without any luck at all.
I unload a squad of boyz to deal with the spiders killing 4/5 with shooting, too far away for assault.
I continue to move steadily towards Dave's army. My Tank Bustas jump out of the Huey, tired of waiting for it to be fixed and along with the rest of the army unload a torrent of Big shootas and rokkits into his serpents and Vypers without any serious damage.
Once again my Grotz appear to have loaded my ammo bins with fireworks.
You can see those intact vypers in the picture... taunting me ;)
Turn 3 - Dave

With the game over the hump Dave begins to count victory points and starts working on damaged units to get as many points as possible.
Aside from some more trukk damage the highlight of the turn was 20 odd shots into my meganobz dealing a ton of wounds, killing 2 of them. Not quite enough to claim victory points, but there will no doubt be more shooting.
Dave also dropped the Nightspinner template on my tank bustas wiping out the squad and my best chance to crack one of his tanks.
Turn 4 - Alex

With most of the trukks on the left flank gone my boyz began to move through cover on the last turn while putting down as much fire as they can.
I let off another torrent of fire and caused more minor damage. I also manage to finish off the Warp Spiders giving me my first victory points.
Still would have been nice to take advantage of the tank bustas, so in there memory here is the marker identifying the crater containing there remains. No doubt the dummy firework rounds the were carrying went off in the process making an awesome display.
Turn 4 - Dave

Dave continues to gun down trukks and boyz to try to take VPs from me.
He wisely continued to move his vehicles in an armored column away from my now on foot boyz.
A well placed night spinner shot did a few wounds on the mobz on the left flank and forced my boyz to make dangerous terrain rolls next turn!
I roll the dice for random game length and the game shall continue!
Turn 5 - Alex

My last good chance to take victory points was a lone rokkit shot at a wave serpent and some big shoota fire to try to take out the vypers.
I shimmy my remaining vehicles and men to take some pot shots as best I can but to no avail.
I shimmy my remaining vehicles and men to take some pot shots as best I can but to no avail.
I chose to leave my last boyz on the left flank in the crater barely within weapons range. I felt it wiser then risking losing them due to dangerous terrain from the night spinner and giving Dave free points.
Turn 5 - Dave
Dave continued to slide his 'wall of wraithbone' out of the majority of my weapons range. Cleverly positioning his vulnerable vypers inside his hulls to give them cover. A few more scatter laser shots rained down on the last of my Orks not in cover and took out the last trukk on my right flank. Dave rolls a 'Kareen!' result sending the trukks contents almost to my own table edge and way out of position.
Turn 6 - Alex
At the start of the turn my riggers finally manage to reattach the rotors of my Huey with Duct Tape and not a moment too soon. My Huey moved to get one last volley of shots on the Vypers but to no avail. The last Ork on my right flank fired his big shoota at the vypers from within the cover of his wrecked trukk with similar results.
Turn 6 - Dave
In Dave's last turn he continued to shimmy his forces away from my remaining Orks and gunned down a few remaining Orks. Luckily many of my squads weren't finished off so they weren't worth as many points to him. But the damage to my forces was quite extensive there was no doubt Dave had won.
Dave rolled for random game length and the game ended on turn 6.
Post Game
Despite some serious problems with crappy ammo and bad dice (I blame the curse of the unpainted figs!) I was actually quite happy with my performance.
In hindsight I could have deployed closer and more aggressively (given that I had the first turn) The turtle formation was not required and even if Dave had managed to steal the initiative he couldn't take the chance of deploying aggressively so deploying my boyz in a more aggressive posture would have helped.
My Attempt to trap him in a corner seemed to be the best way to go. If I had managed to pop a serpent or two Dave would have been in a position to either sit still to protect his troops and get trapped in the corner or escape and leave his troops in the open.
If he sat still I could have rained fire down on him, if he tried to escape I could give chase or ignore him and mop up the vulnerable troops for points. It was a solid plan but bad luck did me in. You can claim I didn't have enough anti-tank Guns but when you fire 20 odd shots in a game, many of them twin-linked and hit twice it really doesn't matter how many gunz you have ;)
By turn 3 I could have given up but I chose not to and I'm glad I didn't. I had fun despite the dice and calculating the points afterwards we realized it was alot closer than we thought.
The trouble with Dave shooting my orks is that each of my squads and tanks are only worth 30-80 points each vs 130-150 for each of his tanks. I didn't actually need to deal that much damage to him to catch up. Killing one of his tanks might had made it a draw, killing 2 might have been a win. With that kind of situation you'd be a fool to give up turn 3 because you still have a good chance to turn it around!
Dave and I discussed his armylist. He had doubts about the one shuriken cannon turret he had, and was debating dropping a single fire dragon to upgrade it to a scatter laser for the extra range. I agreed with him, that lone shuriken was rarely in range. Whereas a single fire dragon would help in one turn and then likely die (being a glass cannon unit) the turret would be useful all game. And really when you have 8 meltaguns in a squad a ninth won't make much of a difference!
Dave and I discussed his armylist. He had doubts about the one shuriken cannon turret he had, and was debating dropping a single fire dragon to upgrade it to a scatter laser for the extra range. I agreed with him, that lone shuriken was rarely in range. Whereas a single fire dragon would help in one turn and then likely die (being a glass cannon unit) the turret would be useful all game. And really when you have 8 meltaguns in a squad a ninth won't make much of a difference!
I also talked with Dave about the army choice. We both agreed that the army in general was solid but the only flaw seemed to be my chinork acting as a halftrakk. It had plenty of firepower but was too slow, being forced to sit still to shoot its gunz. After discussing the options I think I will take out the grotz, and use the extra points I have floating and upgrade the halftrakk to a battlewagon. At least then if it sits still or double times forward it will have the 14 armor to keep it in the game. It will also free up a troop slot and possibly a heavy support if I make the battlewagon a dedicated transport for the meganobz which will help my composition score at Astro.
Thursday, March 10, 2011
The Great Vehicle Upgrade Debate
Ok maybe its not such a big debate, but I loved the title.
I'm currently in the great white north courtesy of work unable to assemble or paint anything so I guess its time for a tactica article. I though I'd share my thoughts on vehicle upgrades. Are they worth it or not? Which are worth taking? etc.
Now personally I'm a minimalist. I believe that you should only give a vehicle the absolute minimum that it needs to be effective. I feel this gives me an interesting take on this subject because I analyze each and every single upgrade mathematically and tactically to decide what I think is worth it or not. In my opinion unless a vehicle upgrade gives you a significant advantage that applies in most games, then you shouldn't bother taking it. At least from a tournament standpoint.
My major reasoning behind this is points. Lets say you take 4 hulls (4 transports) in your army. If you average 30 points of vehicle upgrades per vehicle 30 x 4 = 120 points that you spend on said upgrades. That is easily the cost of a transport or maybe 2 depending on the army. 30 points of vehicle upgrades is not that difficult to get either. What you should ask yourself is "Am I taking advantage of these upgrades in the majority of my games?" If it just has a random effect that only applies 1 of every 4 games, do you really need it? You'd be surprised how many points you can free up with this logic.
So what kind of vehicle upgrades are there?
Just about all vehicle upgrades can be broken down in a few categories listed here
*The upgrades listed are used for example only
1. Mobility
- Reinforced Rams, grot riggers, dozerblades, star engines, red paint
2. Weaponry
- pintle mounted storm bolter / heavy stubber
3. Armor
- Armor plates, extra armor, spirit stones, 'ard case, blessed hull
4. Close combat
- Wrecking ball, boarding plank
Mobility Upgrades are anything that helps keep your vehicle moving. These tend to be more useful for scout vehicles and transports as opposed to tanks. As you want to always keep your transports and scouts mobile.
Typically these upgrades have an effect to either negate, re-roll or repair immobilized results. What is important to note is that immobilized is statistically the most common damage result aside from destroyed. This happens because you have to factor in the extra chances of being immobilized while moving through difficult ground.
I'm really fond of giving difficult terrain re-rolls to the vast majority of my vehicles because A. our tournaments tend to have tables with dense terrain and B. because it gives you the tactical advantage of being able to jump into cover with relative safety.
Now for skimmers this isn't as much of an issue as difficult terrain is entirely a different beast. With the exception of Tau 'landing gear' or whatever its actual name is I probably wouldn't bother with difficult terrain based upgrades at all on skimmers because the chances of requiring them are much smaller. However one must always tailor ones army to the playing style and given situation.
Difficult terrain re-rolls can really be beneficial to vehicle squadrons. Since immobilized results are counted as 'destroyed' for vehicles in squadrons, the re-rolls help make them a bit tougher.
The other type of mobility upgrade are those that give extra movement like red paint and star engines.
Upgrades that give an extra D6" movement or more (even at the cost of shooting) can be very helpful to close a gap or to contest/capture objectives especially in the last turn of a game. This is something that you shouldn't discount, however the cost per upgrade may be prohibitive for putting it on all your vehicles.
Red paint on the other hand I consider useless. 1 extra inch of movement has never been to my advantage. Now some players claim that extra inch is everything for getting into assault fast but I disagree. I tend to play my transports more like gunboats and only striking when appropriate. I don't like to throw myself at the enemy. I position my transports to strike at the right moment so having an extra inch just in case I'm too far away isn't required at all.
Keep in mind that extra inch of movement doesn't count towards your movement rates either (it gives you 19" total movement, but you can still only move 12" and shoot one weapon) If it did then maybe it would be more useful. It's a very colorful upgrade I'll give it that, but it's not the end all be all that some people think it is. /end rant
Weapon upgrades are often very tempting because who doesn't want more guns? What you have to keep in mind is will this weapon be beneficial to the vehicle? If your chimera is always moving a pintle heavy stubber won't be that useful because it will never shoot (being a main weapon) but a storm bolter will fire being str 4.
Same goes for something like a predator annihilator. If your tank has nothing but lascannons to kill tanks, is a pintle storm bolter really to your advantage? if you feel it is then absolutely go for it, but this should give you something to think about.
Where as a pill box tank like a chimera acting as a 'wall of iron' or a leman russ exterminator could very much benefit from a little more firepower.
But as always be mindful of the points. Those pintle mounted heavy stubbers can add up to 100 points quick!
Armor upgrades is anything that helps reduce or negate damage from shooting. Close topped for Ork trukks and extra armor are the classic examples.
Do you want your tanks to last longer on the battlefield? absolutely you do. But the price you pay is alot of points and in the case of closed topped you lose alot of features of the trukks. So it is a balancing act.
I remember extra armor used to be THE upgrade for marines to make sure they had the mobility to get into hth. But luckily the days of space marines on skateboards is over, and extra armor is 15 points now instead of 5. Now it's an upgrade you actually have to think about taking. Personally I'm not fond of it given that being stunned is a fairly low chance compared to being destroyed or immobilized and since your guys can just jump out of a stunned vehicle anyway I don't see it as a big deal. Especially not for 15 points a tank! Whereas on something like a landraider I can definitely see the benefit because you definitely want to keep an expensive tank like that mobile and able to strike.
I'm really not a fan of close topping Ork vehicles though. Although being open-topped makes them more vulnerable (especially in this edition) the benefits in my mind far out weigh the downsides. Being able to shoot with every man onboard and being able to assault the turn you disembark are HUGE advantages that you can't take lightly. So I always take the risk. The only exception is if I'm taking a vehicle strickly for its gunz which is rare.
Another thing to keep in mind is you get the 'extra armor' upgrade for free on your vehicle squadrons. Its a nice perk but you have to remember you have it.
Close combat upgrades are upgrades that give vehicles close combat attacks. I am not fond if this concept at all! Unless your vehicle happens to be a dreadnought. I'm really not fond of the idea of charging my tanks into hth for any reason, especially with hth attacks always hitting rear armor now.
So what have we learned?
Ask yourself what is your vehicles roll? and is this upgrade going to help it accomplish that roll? If not, then you should probably save the points because as always, be mindful of the points!
Tuesday, March 1, 2011
How to Win at 40k Tournaments Part Five: Dealing with Douchebags
If had a quarter for each time someone came up to me and said "Did you see what this guy has in his list? How are you suppose to deal with that!?" my army wouldn't have eaten up nearly as much of my paychecks as it has!
This is a common problem. You get to a tournament and you end up fighting someone with an armylist that seems over the top and you have no clue how to deal with it or you make some simple mistakes, like trying to fight it like any other army, and you get your ass handed to you. Although I still lose to these guys on occasion I don't run into the 'having no way to deal with this' situation anymore. It all comes down to careful planning and analysis of the situation.
In Magic they refer to this as control. It's about being in charge of the board and making sure things happen the way you want. You can't control the other player (as much as you'd like to) but you can manipulate him into doing what you want. Don't try to force your opponent to do things, let him do what he wants but do it under your own terms. You may not be able to control the enemy force but you can control yours which means you can set the stage and position things in such a way to force your opponent to react certain ways.
So let me give you a few real-life examples of what I'm talking about and hopefully I'll get those ideas moving. I'll put up some more scenarios in future articles.
I like to call these Scenarios: 'Noberific'
- The crazy assault army with a unit you can't crack
Situation: Players army includes Ghazkull, 4 ten man nob squads with power klaws, docs (feel no pain), and cybork bodies (5+ inv). Of course all mounted in Trukks.
Just in case you were counting that's 2000 points worth of nob squads and yes this is a real army. It was one of the armies to beat at the 'Ard boyz. Which was 2500 points fyi.
So to make this clear you have 4 units each with
- 10 guys
- 2 wounds each
- 4 power klaw attacks a piece, 5 on the charge
- weapon skill 5
- Feel no Pain
- 5+ invulnerable saves
- In Trukks
- And no doubt some tweaks so that this guy can pick and choose his wound allocation.
Basically if those units hit your lines its going to hurt. So how do you deal with this? Well let's look at the break down. His units are very strong in assault which means he's going to do everything to get there. Once they're in assault you are not going to be able to reasonably stop them.
So how do you beat it?
The automatic response is to blow up the trukks and shoot at them while the walk towards you. This in my mind would be a mistake because they are most vulnerable while still in there trukks. So you do the one thing he isn't expecting. You let him come towards you!

Let's assume that he's foolish enough to keep his trukks together during the drive towards you. Observe the figure to the right. The left hand side shows 2 red Ork trukks (I apologize for the crude diagrams) and a squad of fast moving troops like assault marines and a fast moving vehicle like a land speeder. With a bit of careful positioning you can easily maneuver them to cover as much of the enemy trukk as possible. At which point a couple well placed shots will easily kill the trukks and everyone inside. If you can't cover the entire trukk like shown on the right this can also be to your advantage as dealing with 3-5 Nobz in a tight group is still alot better than dealing with 20 ready to assault you. If your lucky you'll even pin them. The all you need is a well placed battlecannon shot or some good firepower to bring them down.
 Now lets assume he's foolish enough to keep his trukks seperate during his advance towards you. (I like to think that any attempt to approach a trap is foolish)
As shown on the left side of the diagram he keeps one trukk in reserve to counter attack if anyone attacks his guys. You sweep in, surround and blow up his trukk but the as shown on the right, he can then easily sweep in and wipe out your squad. In this case I would just let him do it. By placing my own light vehicle in the way he will either have to take the long way around forcing him in a bad assault position or he'll have to kill the trukk. Either way his 500 point unit eats a 100 point unit or a 50 point light vehicle that has already killed 500 points worth of nobz, no big deal. Then what? His nobz are left dicks to the wind so to speak and you can deal with them how you see fit. If your far enough away he might even jump back into the trukk and you can do this all over again.
So what if you army lacks mobility? well hopefully in that case you have more firepower than god and you'll be able to kill the trukks at a far distance and whittle the squads down before they hit you. The fun part about battlecannon's is the Str 8 guns ignore feel no pain. But considering the durability of the squads and there sheer number its quite likely that a sizeable amount will eventually get to you. This is where the shield wall comes in.
 Review the crude diagram to the right.
The left hand side shows a shield wall of slow but tough vehicles like rhinos or chimeras. These vehicles can sit in front of your line like a shield blocking LOS and acting like a deliberate speed bump. All the while shooting at the incoming Nobz. Even in death they can be useful. The explosions can wound the nobz more, they can't consolidate after killing a vehicle in assault and they act as difficult ground slowing the nobz down. This all helps you gun them down for as many turns as you can. So long as you're careful with your lanes of fire and line of sight so that you don't hinder your own shooting.
The right hand side shows a similar tactic with infantry. In this case the Nobz are green, your forces are blue and a sacrificial squad of yours is red (red shirts!) the point of the front squad is to shoot everything they got and then die! They are a deliberate speed bump. After shooting with the front rank remember to go to ground if possible, being in cover will help you strike first! I realize if they all have power klaws its not a big deal but If they don't it can really help you. Remember to keep a good distance between your wall and your precious troops as you want the nobz stuck in the open for at least a turn after chewing the 'red shirts' so you can shoot them with everything you have. And hell, ensign Ricky might even get lucky and kill the Doc with wound allocation. ;)
This is a common problem. You get to a tournament and you end up fighting someone with an armylist that seems over the top and you have no clue how to deal with it or you make some simple mistakes, like trying to fight it like any other army, and you get your ass handed to you. Although I still lose to these guys on occasion I don't run into the 'having no way to deal with this' situation anymore. It all comes down to careful planning and analysis of the situation.
In Magic they refer to this as control. It's about being in charge of the board and making sure things happen the way you want. You can't control the other player (as much as you'd like to) but you can manipulate him into doing what you want. Don't try to force your opponent to do things, let him do what he wants but do it under your own terms. You may not be able to control the enemy force but you can control yours which means you can set the stage and position things in such a way to force your opponent to react certain ways.
So let me give you a few real-life examples of what I'm talking about and hopefully I'll get those ideas moving. I'll put up some more scenarios in future articles.
I like to call these Scenarios: 'Noberific'
- The crazy assault army with a unit you can't crack
Situation: Players army includes Ghazkull, 4 ten man nob squads with power klaws, docs (feel no pain), and cybork bodies (5+ inv). Of course all mounted in Trukks.
Just in case you were counting that's 2000 points worth of nob squads and yes this is a real army. It was one of the armies to beat at the 'Ard boyz. Which was 2500 points fyi.
So to make this clear you have 4 units each with
- 10 guys
- 2 wounds each
- 4 power klaw attacks a piece, 5 on the charge
- weapon skill 5
- Feel no Pain
- 5+ invulnerable saves
- In Trukks
- And no doubt some tweaks so that this guy can pick and choose his wound allocation.
Basically if those units hit your lines its going to hurt. So how do you deal with this? Well let's look at the break down. His units are very strong in assault which means he's going to do everything to get there. Once they're in assault you are not going to be able to reasonably stop them.
So how do you beat it?
The automatic response is to blow up the trukks and shoot at them while the walk towards you. This in my mind would be a mistake because they are most vulnerable while still in there trukks. So you do the one thing he isn't expecting. You let him come towards you!
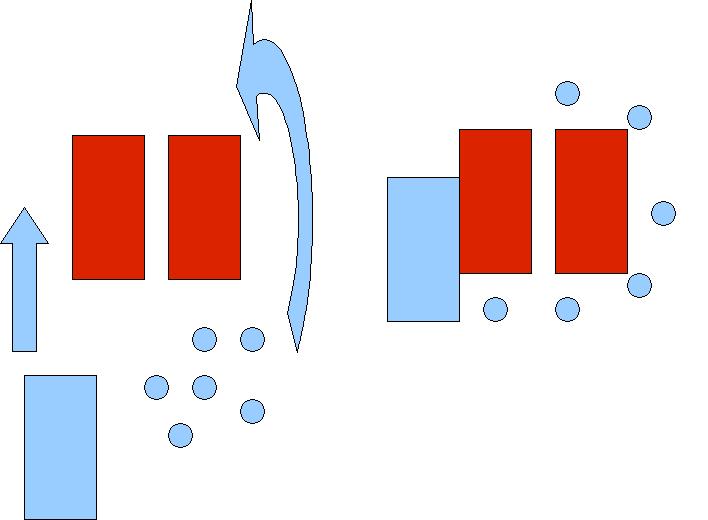
Let's assume that he's foolish enough to keep his trukks together during the drive towards you. Observe the figure to the right. The left hand side shows 2 red Ork trukks (I apologize for the crude diagrams) and a squad of fast moving troops like assault marines and a fast moving vehicle like a land speeder. With a bit of careful positioning you can easily maneuver them to cover as much of the enemy trukk as possible. At which point a couple well placed shots will easily kill the trukks and everyone inside. If you can't cover the entire trukk like shown on the right this can also be to your advantage as dealing with 3-5 Nobz in a tight group is still alot better than dealing with 20 ready to assault you. If your lucky you'll even pin them. The all you need is a well placed battlecannon shot or some good firepower to bring them down.

As shown on the left side of the diagram he keeps one trukk in reserve to counter attack if anyone attacks his guys. You sweep in, surround and blow up his trukk but the as shown on the right, he can then easily sweep in and wipe out your squad. In this case I would just let him do it. By placing my own light vehicle in the way he will either have to take the long way around forcing him in a bad assault position or he'll have to kill the trukk. Either way his 500 point unit eats a 100 point unit or a 50 point light vehicle that has already killed 500 points worth of nobz, no big deal. Then what? His nobz are left dicks to the wind so to speak and you can deal with them how you see fit. If your far enough away he might even jump back into the trukk and you can do this all over again.
So what if you army lacks mobility? well hopefully in that case you have more firepower than god and you'll be able to kill the trukks at a far distance and whittle the squads down before they hit you. The fun part about battlecannon's is the Str 8 guns ignore feel no pain. But considering the durability of the squads and there sheer number its quite likely that a sizeable amount will eventually get to you. This is where the shield wall comes in.

The left hand side shows a shield wall of slow but tough vehicles like rhinos or chimeras. These vehicles can sit in front of your line like a shield blocking LOS and acting like a deliberate speed bump. All the while shooting at the incoming Nobz. Even in death they can be useful. The explosions can wound the nobz more, they can't consolidate after killing a vehicle in assault and they act as difficult ground slowing the nobz down. This all helps you gun them down for as many turns as you can. So long as you're careful with your lanes of fire and line of sight so that you don't hinder your own shooting.
The right hand side shows a similar tactic with infantry. In this case the Nobz are green, your forces are blue and a sacrificial squad of yours is red (red shirts!) the point of the front squad is to shoot everything they got and then die! They are a deliberate speed bump. After shooting with the front rank remember to go to ground if possible, being in cover will help you strike first! I realize if they all have power klaws its not a big deal but If they don't it can really help you. Remember to keep a good distance between your wall and your precious troops as you want the nobz stuck in the open for at least a turn after chewing the 'red shirts' so you can shoot them with everything you have. And hell, ensign Ricky might even get lucky and kill the Doc with wound allocation. ;)
Subscribe to:
Posts (Atom)